Panorama Photography
Introduction
In 1851, only 12 years after the advent of photography, an unknown photographer created a panorama of San Francisco harbor from a series of daguerreotypes. 55 years later in the same city, George R. Lawrence lofted his "captive airship" to photograph the aftermath of the earthquake from 2000 feet up. It was actually a 49-pound panorama camera tethered beneath a series of kites. The result -- an amazing 18 3/4 x 48 3/4 inch contact print.
Dedicated panorama cameras have been available for over 100 years but are generally bulky, expensive, and dedicated. Home computers and digital photography have opened up this field of vision by allowing us to stitch together images from conventional cameras. Our discussion will be on this new workflow.
I've had good success making panorama photos from a variety of cameras ranging from sub $800 consumer cameras to professional film and digital cameras. A side effect is that a relatively small resolution camera can produce images of 40 or 50 megabytes resulting in very sharp prints. My favorite combination has been the Nikon D2x with the 28mm PC or 35mm PC lenses. The perspective corrector lenses allow me to raise or lower the lens to emphasize sky or foreground without getting the horrible horizon curvature I often got when I tilted my Fujiwide 6x17 or Widelux camera.
Remember, panorama images utilize the same composition rules of standard format pictures. Merely taking a standard scene and making it wider isn't going to automatically make a successful panorama -- the entire image must work together esthetically.
Setting Up
First
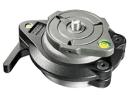
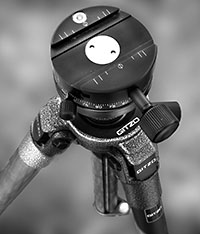
Level your tripod independent of the tripod head. Having the base level assures you that the rotational plane will be on a level axis. I use a Gitzo tripod with a small bubble level built-in to the tripod. Lately, I’ve added a $65 Manfrotto compact leveling head (BG3502) (rt) to speed up the leveling process. On top of that I mount my Arca Swiss ball head.
Recently I had a chance to try Really Right Stuff's "Panning Clamp with Level" and it worked well with one of Gitzo's new "wobbler" center column tripods. The clamp alone runs $235 but it is truly a gem of engineering. The level was dead-on. This RRS Pan head and Gitzo's 1227LVL carbon fibre tripod is a perfect backpacking combination.
Second
I mount my camera and use a bubble level to level the camera. Then, I do a verification by matching the corners of the image. I view the top left corner and rotate the camera to find a good alignment target. Then I swing the camera to make sure the top right corner is on the exact same target. This verifies the images will match end to end and corrects for any slight errors in balancing either the base or camera. I use a perspective corrector lenses to move the image up or down to adjust the vertical composition -- the best way to guarantee a level horizon. However, I’ve found with some lenses (usually longer than 35mm, you can get away with carefully tipping the camera forward or back to get more sky or foreground.
If your final images go together in a stepped fashion or assemble in a large arc, you know something was not leveled properly. Before shooting in the field verify that your bubble level is accurate as I've seen poorly aligned levels in very expensive tripods. You can save a misaligned image by cropping the top or bottom, adding missing portions, or doing some custom image stretching.
Third
Ideally you should be pivoting the assembly on the nodal point of the lens to eliminate any parallax errors. This is most noticeable when you have objects in the foreground less than 50 or 100 feet away. Here are some tools I use followed by a method to determine the nodal point of your particular lens. Basically, you want to be able to rotate the camera on an invisible spot somewhere beneath the beneath the lens It may be beneath the front element or with some cameras it could be beneath the film plane. It depends on lens design. With variable focus or zoom lenses, the nodal point will probably shift as you change focal lengths.
Hardware
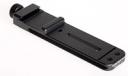
You need a way to slide the camera left, right, fore and aft. A solution for small cameras is the Wimberly M-8 plate shown below combined with a camera base plate. It's simple, lightweight, and the least expensive I've found. Caution — this is a 4-inch plate and will only work with short lenses and some pro-sumer cameras. Don't forget to measure from the back of your camera. Part # M-8 at about $85.
Really Right Stuff has the 6 inch long MPR-CL plate (rt) for $110. Their new MPR-CL II plate has an engraved scale on the side, a built in level and measures 7.44 inches. This is the one I recommend.
Kirk has an LRP-1 universal plate. It's 6 1/2 inches long, $120, and worked with my short Nikon lenses including the PC lenses — but not some of the others (a bit too short).
With all these plates, you'll need an Arca Swiss type camera base plate. The custom fitted ones are best, but Wimberly makes a little universal plate (P-5) for about $52. And, of course, you’ll need an Arca Swiss type tripod head with the above plates.
Finding the Nodal Point
To find the exact optical pivot point of the lens, set up your camera as described above and find a thin foreground object such as this small branch shown below. Align it with a background object.
Now, when you rotate your camera on your tripod head, you should not see any movement between the foreground object and the background. It should stay in direct alignment. Here's an example of what it should NOT look like:
One thing you must realize is that all lenses, including some of the very finest architectural lenses, have a bit of distortion. They are not perfectly rectilinear and will have a bit of barrel distortion. Here's an exaggerated example of what I'm talking about:
Obviously, putting two images like this together side-to-side is going to present some problems. You cannot expect to put them to overlap perfectly—no matter how careful you are in the shooting process:
However, if you put these images together and have them overlap, you'll find there will be points that do overlap although they will not be in a direct vertical alignment:
Image Capture
Position your tripod carefully before you do any fine adjustments and balancing. I recommend you make your composition with your camera hand-held. I find that even an inch will often improve the composition. When you find the shooting spot, then and only then attach your tripod. If you try and do this with the camera on the tripod you’re often settling for the most "comfortable" spot.
Overlap
Balance your camera and preview the image by rotating the camera on the tripod. Verify the level by matching corners as you rotate. Decide how many exposures you will need and plan the capture so critical areas will not fall on a seam. I usually overlap about 25% but with very wide-angle lenses, you may wish to increase this to as much as 50%. Personally, I never increment in precise numbers. With my Nikons, I like to use the outside brackets as markers.
Make sure you turn off all the AUTO modes on your camera. I always shoot with my exposure control set on manual to make sure the image densities are identical. Turn off your auto color balance. Know your camera’s personal tastes – I like to set the color balance on "cloudy" in order to get a slightly warmer image. Make sure your focus is locked so it isn’t changing. Set your ISO at its lowest speed to give you the finest quality. When setting the exposure, I favor the highlight areas and I use raw format whenever possible to allow me to easily bring out underexposed areas. Finally, make an extra exposure at each end of the scene in case you need it later.
There are several fine "stitching" programs that do a fairly good job of assembling images. Your camera may have come with one. However, with these programs, I've usually found areas that were obvious or detectable and I learned that I could use Photoshop to assemble images in a totally seamless fashion.
I suggest you use Photoshop’s’ “Auto Merge“ and let it attempt the merge. You can then save the file along with layers and fine tune the image. Or, assemble your images in Photoshop by starting with the most important image as a base and use Images/Canvas to increase the picture area. I drag another photo on top of this image to create a new layer. I then set the new layer to about 60% translucency and carefully align a critical spot -- possibly a tree on the horizon. I then go back to 100% translucency on this layer and fine tune this combination using Photoshop's layer mask feature. Here's an example with the layers pulled apart. Note the meandering blend line:
I print my images on one of several Epson printers. My 9800 will knock out an image quickly on 44 inch wide paper and I usually keep it set up with mat ink. My new 7900 however has me spoiled. It prints twice as fast and has a much greater color gamut.
The above tips work well for me. However, I have made many very nice panoramas that were hand held without a tripod. Just make sure you keep the above guidelines in mind. Don't be afraid to experiment.
I hope this information will help you with your panorama photography. Good shooting.